Monday, November 29, 2010

Spray Paint: A Series

Project #2: Updating Light Fixtures

Difficulty Level: Moderate
Price Range: FREE!

I had several unattractive light fixtures in my home but did not have the budget to replace them.  Here are some of the fixtures I came across in my search.

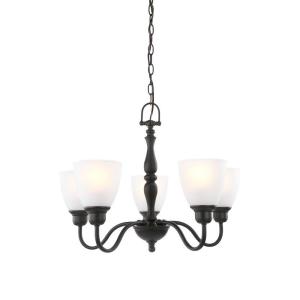
Home Depot Hampton Bay Woodbridge 5 light Chandelier
$99.97

 Hampton Bay Woodbridge 5-Light Chandelier EZM8115P-2

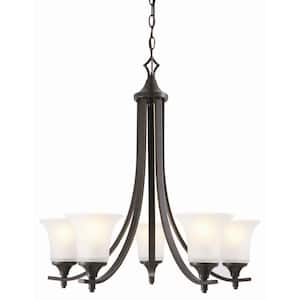
Home Depot Design House Juneau 5 light Chandelier
$269
Design House Juneau 5-Light Oil Rubbed Bronze Chandelier 515791

Pottery Barn Audrina Chandelier
$149

Audrina Chandelier, 4-arm, Rustic Bronze finish

I like the look of exposed bulbs... it gives the chandelier a more modern feel in my opinion.  So I took the absolutely horrible builders-grade chandelier that came in our dining room and gave it a spray paint makeover.

Before:


During:


After:


Disconnecting and rewiring the chandelier was by far the most difficult part of the whole process.  Before disconnecting/hanging any electrical product make sure the circuit breaker is OFF!  The wires are color coordinated most of the time and there should only be three total (one red, one black, and the ground wire which is copper).

Next I needed to update an hideous bathroom light fixture.  Again, it was cheap builders grade but my options were limited.

Pottery Barn Sussex Double Sconce
$99

Sussex Sconce, Double, Antique Bronze finish

I even checked Walmart.  I found the TransGlobe Lighting New Century 8.5" Wall Sconce but it was still $70.20!

In the end, I spray painted my own.  And I did it while it was on the wall!  Just taped a whole bunch of newspaper around the fixture after removing the shades and bulbs.  Turned out perfect and not one stray spot of spray paint.


Check tomorrow to see how I updated several home decor items around my house!

Blessings,

Jen

Sunday, November 28, 2010

Spray Paint: A Series

Project #1: Curtains rods and hardware
Difficulty Level: Easy
Price Range: $10-15 per set depending on what type of curtain hangers you get (clips, ribbon, etc)


I love spray paint.  LOVE IT!  Want to know what you can spray paint?  EvErYtHiNg!  And I have.  Seriously.  Over the next several days I will feature a variety of items that I have spray painted while offering lots of tips on the "dos" and "do nots" of spray painting.

I love the look of oil rubbed bronze spray paint.  I do not love the price.  Have you noticed my issues with money yet?  I am cheap and proud of it and living with no credit card debt and intending to keep it that way.  Maybe my next series should focus on money saving tips and my obsession with vinegar?!?!  Ok, back on topic.  Here are some items that inspired me.

Pottery Barn Standard Drape Rod in Antique Bronze finish
Small (28-48 in) $99

PB Standard Oversized 1.25" diam. Drape Rod, Small, Antique Bronze finish, Ball Finial

Pottery Barn Clips and Round Rings 
Set of 7 (two sets required per pair of drapes) $21
Clip Rings, Set of 7, Small, Antique Bronze

Total, before adding in the drapes themselves, equals $142!!!  Seriously!?!?!?!  For drapery hardware!  Who has that kind of money?  And even if you have money, why would anyone want to spend so much on something that will almost entirely covered by a drape!?!?!

Well, I made my own.  For under $20.  Take that Pottery Barn!

Step One: Purchase oil rubbed bronze spray paint from the HD for around $6


Step Two: Purchase dowel rods from HD and have the cute guy work the lumber section cut them down for you.  Haul them home and drown them in spray paint.  I also spray painted the closet hardware I purchased from HD.  These allowed me to easily mount my drapery rods.


Step Three: Put on a second coat.  Wait for the to dry.  Hang them up!  That's it.


I used these wooden dowel rods in two different rooms.  The drapery clips pictured above were purchased for $6 from Michaels.  

Tomorrow I will focus on updating lighting with spray paint!

To learn how to make the curtains featured in my pictures, check out my canvas series.

Blessings,

Jen

Thursday, November 25, 2010

Bad Blogger...

So I have neglected my blog.  I apologize.  I promise to deny myself chocolate as a penance for the next month hour.  But I have a really good excuse.  I am in Hawaii... yep, blogging from a "lanai."

I want to provide you with some photos that I hope you can download and use for projects.  I have several pieces of homemade art that are actually beautiful photos I borrowed from fellow bloggers.  This is going to be a flower series.  I will upload others over the next few days!  Enjoy!


Sunday, November 14, 2010

Meals for a Week #1

In addition to crafting, sewing, and constant rearranging of home decor, I also LOVE to cook.  I also LOVE to organize.  Furthermore, I HATE wasting money.  These are the reasons that drove me to create pre-set menus before heading to the grocery store.

Price Range: $30-40 depending on what "pantry items" you have on hand and where you shop

Features:
-A grocery list detailing every item you need to make four dinners and one bread/breakfast item
-Individual recipes


Meals for a Week #1 

1.     Chicken Scallopine 
2.     Low-Fat Turkey Chili 
3.     Weeknight Enchiladas with Black Beans and Yellow Rice 
4.     Baked Chicken with Potato Bundles 
5.     Basic Blueberry Muffins 

Pantry Items (check that they are in the house):

  • Flour
  • Olive oil
  • Salt and Pepper
  • Oregano
  • Linguine pasta
  • Lemon juice
  • Butter
  • Ground cumin
  • Minced garlic
  • Parmesan cheese
  • Aluminum foil
  • Italian bread crumbs
  • Capers
  • Vegetable oil


Grocery Items:
  • Meats:
    • 2 lbs ground turkey (buy two separate packages or seperate)
    • 2 lbs chicken breast
  • Produce:
    • 1 bunch fresh cilantro
    • 3 small onion (yellow or white)
    • 1 package white mushrooms
    • 1 bunch fresh parsley
    • Celery
    • 1 red bell pepper
    • 1 green pepper
    • Russet potatoes
    • One large carton/Two small cartons blueberries
  • Canned Items:
    • 1 (10 3/4 ounce) tomato soup, undiluted
    • 1 (10 ounce) can mild enchilada sauce
    • 1 can pinto beans
    • 1 (28 ounce) can crushed tomatoes
    • 1 can corn
    • 1 can black beans
  • Dry Goods:
    • 1 package saffron rice
    • 1 packet mild chili mix
  • Dairy:
    • Sour cream
    • 1 bag shredded cheddar cheese
    • Small container heavy whipping cream
    • Eggs
  • Other:
  • 1 package flour tortillas
  • White wine
Chicken Scallopine

Ingredients:
  • Linguine pasta
  • 6 boneless, skinless chicken breasts
  • Flour
  • 2 tablespoons olive oil
  • 4 tablespoons butter
  • Capers
  • 12 ounces white mushrooms sliced
  • 1 cup white wine
  • 2 tablespoons lemon juice
  • 1/2 cup heavy whipping cream
  • Fresh parsley (optional)

Directions:
  1. Cook linguine according to package instructions
  2. Flatten chicken breasts to 1/4 inch and coat in flour
  3. Add olive oil and butter to pan and brown chicken
  4. Remove chicken from pan and add sliced mushrooms
  5. Cook mushroom until slightly brown
  6. Add lemon juice and white wine to pan and simmer for two minutes
  7. Add cream, parsley, and capers and simmer for another two minutes
  8. Serve chicken over pasta and pour sauce on top

Low-Fat Turkey Chili

Ingredients:
  • 1 tablespoon vegetable oil
  • 1 medium onion, chopped
  • 1 red bell pepper, chopped
  • 2 celery stalks, thinly sliced
  • 1 green bell pepper, chopped
  • 1 lb. ground turkey
  • 4 garlic cloves, minced
  • 1/4 cup mild chili powder mix
  • 1 (28 ounce) can crushed tomatoes
  • 1 (15 ounce) can pinto beans, drained
  • 1 teaspoon oregano
  • 1 teaspoon salt
  • 1 (9 ounce) box frozen corn

Directions:
  1. Using a large pot, combine oil, onion, red and green peppers, celery, and turkey and cook for two-three minutes or until turkey is no longer pink
  2. Add garlic and cook for another minute
  3. Add chili powder and cook for one minute, stirring continuously
  4. Add tomatoes, bean, oregano, and salt and stir to combine
  5. Bring chili to a boil
  6. Reduce heat to low and simmer, partially covered, for 20 minutes
  7. Add frozen corn and cook for ten minutes


Weeknight Enchiladas with Black Beans and Yellow Rice

Ingredients:
  • 1 lb. ground turkey
  • 1 small onion, chopped
  • 1 (10 3/4 ounce) tomato soup, undiluted
  • 1 (10 ounce) can mild enchilada sauce
  • 8 flour tortillas
  • 2 cups shredded cheddar cheese
  • Sour cream (optional)
  • 1 (5 ounce) package saffron rice
  • 1 can black beans
  • 3 tablespoons lime juice
  • 1 teaspoon chili powder
  • 1/2 teaspoon ground cumin
  • 2 tablespoons fresh cilantro (optional)

Directions:
  1. Preheat oven to 350*
  2. Cook rice according to package instructions
  3. Combine black beans with lime juice, chili powder, and cumin and heat in microwave or on stove until hot (add cilantro when hot if you would like)
  4. Cook turkey and onion in non-stick skillet until turkey is no longer pink
  5. Stir in tomato soup and enchilada sauce and heat for two minutes
  6. Spray glass baking dish with non-stick spray
  7. Place 1/4 cup of turkey mixture into each flour tortilla, roll up tortilla, and place in baking dish
  8. Cover enchiladas with remaining turkey mixture and sprinkle with two cups cheddar cheese
  9. Cover dish with aluminum foil and bake for 20 minutes
  10. May serve with sour cream

Baked Chicken with Potato Bundles

Ingredients:
  • 4 boneless, skinless chicken breasts
  • Italian breadcrumbs
  • 6 Russet potatoes
  • 1/2 yellow onion, diced
  • 1 stick butter
  • 1/4 cup heavy cream (or milk)
  • Salt
  • Paprika
  • Pepper
  • 2 tablespoons fresh parsley (optional)
  • Aluminum foil

Directions:
  1. Preheat over to 400* and cover baking sheet with aluminum foil and coat with non-stick cooking spray
  2. Place chicken in large ziplock bag and pound to 1/4 inch thickness
  3. Coat chicken with breadcrumbs and place on baking sheet
  4. Tear off small sheets of aluminum foil just large enough to accommodate the diced potatoes and onion
  5. Dice potatoes into 1/2 inch squares and roughly chop onion
  6. Place equal portions of potato and onion onto each square of aluminum foil
  7. Put two pads of butter, a splash of heavy whipping cream, a dash of paprika, and salt and pepper to taste on each set of potatoes
  8. Fold up the aluminum foil and create little “bundles”
  9. Bake chicken for 25-35 minutes and juices run clear
  10. Bake potatoes for 35-45 minutes (cooking time will vary depending on how soft you like your potatoes)

Basic Muffins

  • 1 1/4 cup flour
  • 1/4 cup oats
  • 1/2 cup sugar
  • 1 tsp baking powder
  • 1/2 teaspoon baking soda
  • 1/4 teaspoon salt
  • 2 eggs
  • 1/2 cup milk
  • 1/3 cup vegetable oil
  • 1 1/4 blueberries – OR – 1 cup chocolate chips
  • 2 tblsp flaxseed (optional)


Directions: 
  1. Preheat over to 400*
  2. Mix together all dry ingredients
  3. In separate bowl, combine milk, eggs, and vegetable oil and whisk for 5 minutes
  4. Slowly add dry ingredients to the wet ingredients
  5. Fold in blueberries
  6. Bake for 18 minutes
This system has made my life so much easier and saves me time!  Additionally, I know I am going to use everything I buy.  Hope this helps all you busy moms and dads out there!!!

Blessings,

Jen

Saturday, November 13, 2010

Canvas Crazy: A Series

Project #5: Christmas Stockings

Difficulty Level: Easy
Price Range: Free!

So this year I am committed to not spend a single dime on Christmas decorations.  Even if I make something, I can only use supplies I already own!  I have been wanting new stockings for two years but am shocked at how expensive they are.  Here are some I found:

Pottery Barn $19 x 4 stockings = more than I am willing to spend on stockings


Ballard $34 x 4 stockings = I do not want to discuss this issue


I do love the natural look of the Ballard design, so I chose to utilize by trusty canvas material, some craft glue, and newspaper to make my own.

Step 1: Determine the appropriate size for the stocking... I used an old stocking I had in the attic.  Make sure you allow enough length to create a cuff (hence why the stocking in the photo looks funny).


Step 2: Create a template.  I used newspaper and traced around the blue stocking to get the correct shape.  I grabbed the first piece of newspaper I could find and it was the Hobby Lobby ad!!!  God is testing me but I am determined to stay strong.  I cut right through the 40% off coupon and never looked back.


Step 3: Use the template to trace and cut out as many stockings as you desire... I wanted to make four total so I had eight pieces.


Step 4: Use fabric glue and glue to stockings together with the "good sides" facing each other.  Let dry for several hours.


Step 5: Once the stockings are dry, turn them right side out and fold over the cuff.


This is the final product.  I still need to iron the edges flat and embellish each stocking with ribbon and other craft goodies!

Hope you are enjoying the beginning of the holiday season!

Blessings,

Jen

Friday, November 12, 2010

It's A Party

Here are some of the linky parties I am participating in today!  Check out the sites of these amazing women!

http://decormamma.blogspot.com/

http://www.remodelaholic.com/

http://www.fingerprintsonthefridge.com/

http://funtocraft.blogspot.com/

http://shabbynest.blogspot.com/

http://thehillsarelivin.blogspot.com/

I am so thankful for all of the inspiration and fellowship us crafters can find on the web!  I pray each of you has a weekend filled with peace and blessings (and projects, of course)!

Jen

Thursday, November 11, 2010

Canvas Crazy: A Series

Project #4: Rosettes

Difficulty Level: Easy... and I mean EASY!  If you can use glue you can complete this project!
Price Range: Freeeeeeeeee

So, this project has been done many times before by many bloggers so I am going to keep it short and sweet.  The canvas rosettes are made from scraps cut down to about one-inch in width and 18-36 inches in length.  The longer the strip of fabric, the larger your flower will be.

I started with this:


Added some hot glue and ended up with this:


Oh, and there may have been a second-degree burn or two involved.  I can sew.  I can paint.  I can manage an auger with the best of them.  God help me, I can not use a glue gun.  Burn myself EVERY TIME!

I have placed these rosettes on lampshades, decorative pillow cases, purses, and even pinned one to a sweater.  The possibilities are endless and no matter how you incorporate them, you will be in style.

Blessings,

Jen

PS Has anyone ever made a dog bed?  My husky has made it perfectly clear she wants a BED.  Her dog pad is simply not cutting it anymore and she has moved into our weenie dogs bed.  I now have a disgruntled husky and ticked-off weenie.  I need some suggestions!


Wednesday, November 10, 2010

Canvas Crazy: A Series

Project #3: Bedskirt

Difficulty Level: Easy
Price Range: $5-10 depending on size of bed

One thing that chaps my hide (I have always loved that saying... no idea why) is the cost of bedding.  Even at "cheap" places, bedding is expensive.  I looked everywhere for a bedskirt for our guest bedroom and this is what I found:


Bedskirt from Bed Bath and Beyond, neutral color, no ruffles, $40!!!  That much money for something that serves no purpose other than hiding the ugly medal bed frame.  So I dove into my supply of canvas and made one!

Here are the step-by-step instructions (all I can think of when I type that phrase is the TV show that used to be on with Suzanne Somers... I loved that show at one point in my life and I am not ashamed to admit it).

Step 1: wash, dry, and iron canvas

Step 2: measure how tall your bed frame is so you know how long to make the edges of the bedskirt (I used an old bedskirt as a guide)

Step 3: remove husky puppy from bedskirt


Step 4: cut fabric to size... I actually stitch the canvas directly to the old bedskirt because I do not want to waste canvas on the part of the bedskirt that is hidden by the mattresses

Step 5: step back to take photo of progress and trip over sleeping husky puppy


Step 6: get dirty look from husky puppy who was so rudely awakened when you almost killed yourself tripping over her


Step 7: pin the cut canvas to the existing bedskirt, stitch together, and repeat on all three exposed sides


Step 8: cut away the decorative portion of the original bedskirt (for me, this involved removing the brown and blue striped fabric so I was left with the white portion that goes under the mattresses and the canvas edges)

Step 9: enjoy your $5 bedskirt that you can complete in around two hours (unless you have a husky puppy too)


Please excuse the horrible picture quality and the awful green paint in the photo above... this room is a work in progress.

Check back tomorrow to learn how to create canvas pillow covers and canvas flower rosettes.

Blessings,

Jen

Monday, November 8, 2010

Canvas Crazy: A Series

Project #2: Table runner

Difficulty: EASY
Cost: $5 per runner

Again, I used painter drop cloths from Home Depot that cost $10 for a 9x6 ft cloth (unless you hit the sale where you get two 9x6 cloths for $10... that was one heck of an exciting day).  Simply cut the fabric to size, stitch the raw edge, and display!

This was my inspiration: Pottery Barn Hemp Table Runner, $39 on sale right now for $29.  PRICEY!


This is my homemade version:


Here is a view of how the runner fits in the entire space:


 I will discuss how I refinished the table, repurposed the chandelier, and how I made the centerpiece from Goodwill finds over the next few weeks so stay tuned!

Blessings,

Jen

PS These would make PERFECT Christmas gifts... you can embellish the runners with ribbon along the edges or iron-on monograms.  So many options!  Please share your ideas... I will be making several for my friends this holiday season.

Sunday, November 7, 2010

Canvas Crazy: A Series

I am a bit addicted to canvas... as in painters canvas drop cloths that you can purchase at Home Depot for CHEAP!  Over the summer they ran a special... two 9x6 drop cloths for $10.  Can't beat that!

Project #1: Curtains

Difficulty level: Easy
Price Range: $10-20 per window depending on size

I wanted neutral curtains for three rooms in my house... FOUR windows in all.  I looked at Pottery Barn and could have ordered curtains, rods, and clips from them for around $600 (buying their "cheap" cotton drapes).  My total for all four windows, including hardware, was $77.  Actually, it was a bit more than I wanted to spend, but two of the windows are double windows and all curtains had to be floor to ceiling.

Drop cloths - $20
Wooden dowels (made into curtain rods) - $12
Curtain clips - 6+6+10+10 = $32
Spray paint - $6
Mounting hardware - $7
Ribbon - free (had it from another project)

Here are the drop clothes... make sure you wash them before using in case they shrink.

(Excuse the horrible picture quality)

I purchased wooden dowel rods from Home Depot and had a nice gentleman cut them down to the appropriate size in the store.  I brought those babies home and gave them a quick sanding and two coats of Oil Rubbed Bronze (I will be featuring a series on ORB shortly).


The hardware is simply closet brackets that I sprayed to match.

While waiting for the spray paint to dry, I cut and sewed my curtains (if sewing is not your things, iron-on adhesive works just fine).


These are the final products with some details included.

Window #1


These curtains were hung on a spray painted dowel rod using closet brackets.  I sewed ribbon loops instead of using curtain clips because the ribbon is CHEAP and adds nice detail.  Plus, you can use any color of ribbon you want!

Window #2


These curtains are puddled at the bottom and hung from fancy-shmancy curtain clips.

Window #3


I actually used black spray paint on this dowel rod and slightly larger curtain clips.  I then broke a drill bit attempting to hollow out a baseball to stick on the end... but it was totally worth it!!!

Window #4

 These are technically hung from the wall using closet brackets.  There is a nook in the game room that is slowly being turned into my craft space.  The curtains hide the chaos!!!!!!

Hope you enjoyed... four windows, two days, $77 = one happy crafter!

Blessings to all,

Jen